Using RPKI on MikroTik RouterOS 7 (7.21)
I run my personal AS 215777 and as part of learning – and because I consider BGP security important – I wanted to start validating routes using RPKI. Here’s steps I did to enable it on RouterOS 7.21.
What is RPKI
RPKI (Resource Public Key Infrastructure) is a security framework designed to make internet routing more secure. It works by allowing IP address holders to cryptographically sign records – called Route Origin Authorizations (ROAs) – that declare which Autonomous Systems (AS) are authorized to announce their IP prefixes. Routers can then validate incoming BGP route announcements against these signed records, rejecting any that do not match. This helps protect against BGP hijacking, where malicious or misconfigured networks accidentally (or intentionally) redirect internet traffic by announcing IP prefixes they don’t own.
Step 1
I installed Routinator. Although there are other implementations, Routinator appears to be widely used, and I wanted to have the least friction when getting started. I run it as Docker container inside my network, exposing ports 3323 and 8323. I’m running it on separate machine because I already have setup there for containers, but given that RouterOS now runs containers as well, I think you could run it directly there as well.
My configuration is pretty simple.
repository-dir = "/var/routinator/rpki-cache"
validation-threads = 4
The initial startup takes few minutes, so don’t panic if the UI is not immediately available.
Note: There are public instances available – for example RIPE is running Routinator – but running it on local network makes more sense and is more robust.
Step 2
In Routing > RPKI (/routing/rpki) I added my Routinator instance. You need to provide a group name (opaque identifier), IP address and port (default is 3323, protocol is called RPKI-to-Router (RTR)). I left the rest default.
/routing rpki add address=<IP address> disabled=no group=<name> port=<port>
At this point if you switch to Sessions (session) you should see active session there.
Step 3
Now it is time to actually start validating routes. It is not just a checkbox – you have to enable it using routing filter rules. For simplicity, I opted to put the validation logic directly into the rule I’m using for my BGP sessions. You can create separate one and jump into it and optionally return back as needed.
First you need to call rpki-verify <group name> to do the verification. And then create condition using rpki (i.e. if (rpki invalid) ...) that accepts or rejects or bumps priority or … of that route. Possible states are invalid, unknown, valid, unverified.
My current logic is intentionally simple.
rpki-verify <group name>;
if (rpki invalid) {
  reject;
}
...
Another common rule is to deprioritize routes that are unknown.
Testing
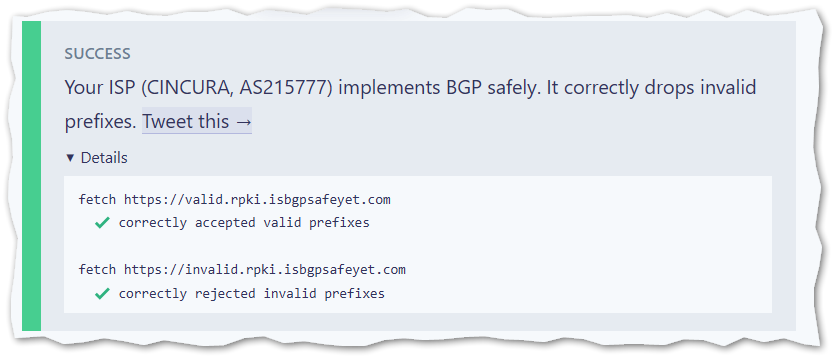
If you head to isbgpsafeyet.com (run by Cloudflare), you can test whether you’re properly rejecting invalid routes.
Conclusion
Although implementing security in existing systems and protocols is sometimes a bit cumbersome to set up and run, the configuration on RouterOS is pretty straightforward and Routinator makes the whole setup really easy with single all-in-one container.
